7. VPI を使う (Version 2.16以降、開発中)
VPIとは、Verilog Procedural Interfaceで、第3世代のPLIです。CやC++等の外部言語ルーチンを使う場合のインターフェースを定義したものです。VPIのライブラリは、膨大で,とてもその全てをサポートすることはできません。Veritakでは、よく使うであろうサブセットのみを実装し提供します。
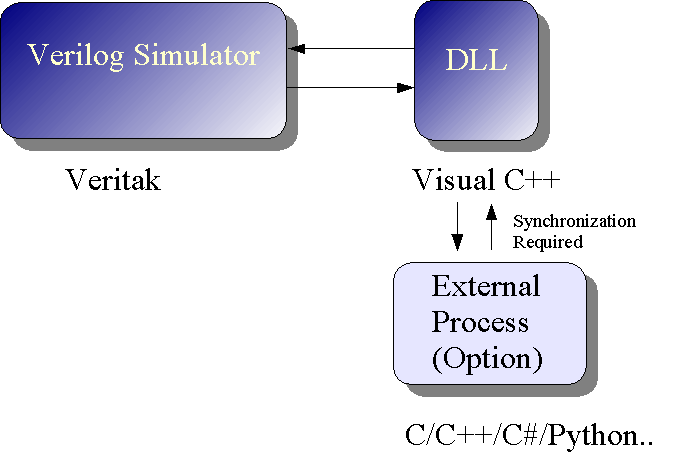
7.1シミュレータとDLL(Dynamic Link Library)の関係
DLLは、Delay Locked Loopではありません。動的なライブラリ(ルーチン集)です。ユーザルーチンは、DLLで作成します。
Verilog シミュレータが主で、DLLは従の関係になります。DLLは、Verilogシミュレータのプロセスと同じ空間に動的にマップされます。外部アプリケーションと、シミュレータを通信させたい場合は、DLLを介して通信を行います。この場合、プロセス同期の問題があり、パイプや、共有ファイル等のOSに備わっている高度なテクニックを使いながら、プロセス同期をDLL内で行うことになります。
このチュートリアルでは、シミュレータとDLLだけで完結する簡単な例をとりあげながら、VeritakにDLLを組み込む方法を説明します。
7.2 VPIでできること
サンプルで見ていきましょう。DLLまで組み込ん済みのプロジェクトがsamples\vpi
にあります。
最初のサンプルは、first_callback.vtakprj です。走らせてみてください。
7.2.1 first_callback.vtakprj
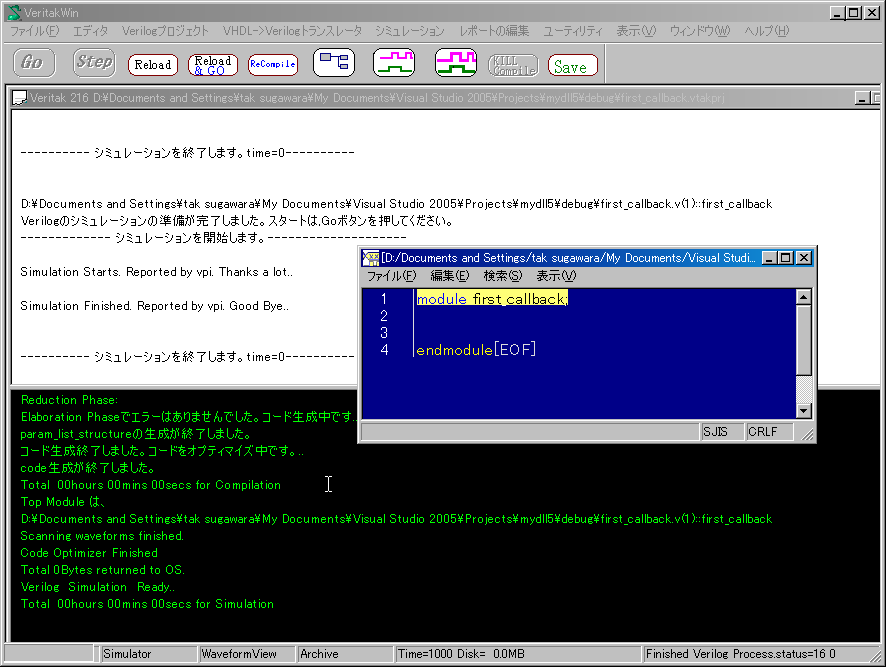
このソースのmodule には、中身がありません。にもかかわらず、コンソールにメッセージが出ていますね。
これは、あらかじめ登録されていた関数を呼び出すことで実現しています。これをコールバック(callback)
といいます。呼び出された関数は、次のソースです。(なお以降のソースは、samples\vpi\vpi_source\下にあるmath_vpi.cppから抜き出したものです。)
static int sys_end_of_simulation(p_cb_data cb_data)
{
     vpi_printf("Simulation Finished. Reported by vpi. Good Bye.. \n\n");
      return 0;
}

static int sys_start_of_simulation(p_cb_data cb_data)
{
     vpi_printf("Simulation Starts. Reported by vpi. Thanks a lot..\n\n");
      return 0;
}
ところで、これを、いつ呼び出されるのかを決めないといけません。そのための登録が必要になります。
。これは、
void sys_math_vpi_register()//VPI call/callback register routine
という関数中の、
// cbStartOfSimulation

      cb_data.reason = cbStartOfSimulation;
      cb_data.cb_rtn = sys_start_of_simulation;
      cb_data.user_data = 0;
      vpi_register_cb(&cb_data);//register callback

// cbEndOfSimulation
      cb_data.reason = cbEndOfSimulation;
      cb_data.cb_rtn = sys_end_of_simulation;
      cb_data.user_data = 0;
      vpi_register_cb(&cb_data);//register callback
で登録しています。vpi_register_cb というのが、登録の関数です。また、cb_rtnで、飛び先を登録しています。 では、いつ飛ぶのか?を決めているのが、reason
のところで、それぞれ、
- cbStartOfSimulation
- cbEndOfSimulation
です。これは、vpi_user.h で決められている定数です。(大抵のシミューレータベンダーは、Verilog
2001 の規格書に載っている値をそのまま使っていると思います。) その名の通り、それぞれ、シミュレーション開始と終わりに呼び出す、という意味になります。
7.2.2 hello.vtakprj
次は、定番のhelloです。今度は、ソース中から関数を呼んでいることが想像つくと思います。
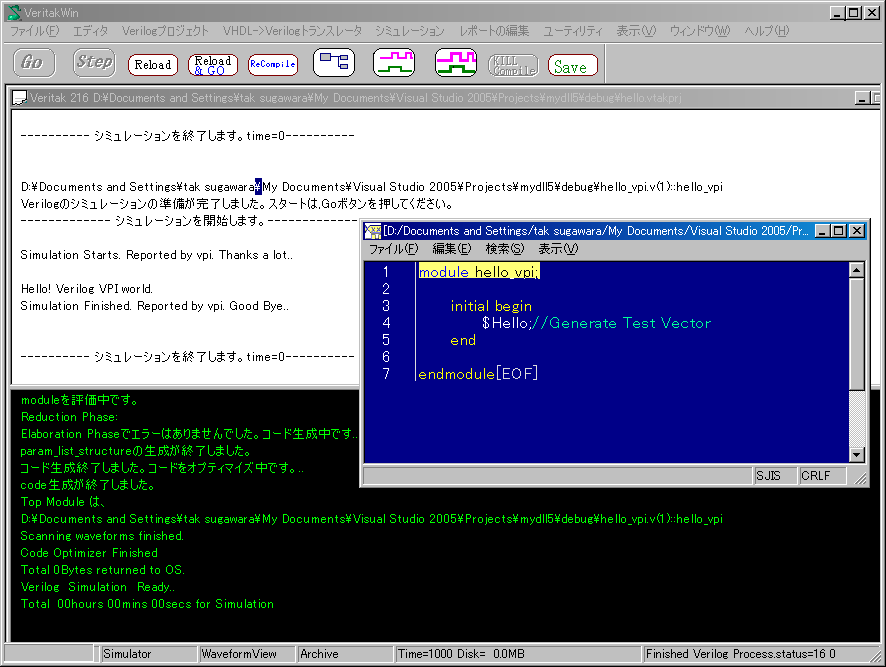
呼び出された関数は、
static int sys_hello(char* name)
{
     vpi_printf("Hello! Verilog VPI world.\n");
      return 0;
}
です。登録は、次のように、vpi_register_systf で行います。calltfが飛び先になっていることが分かります。
   tf_data.type      = vpiSysTask;//Task Jun.15.2006
      tf_data.tfname    = "$Hello";
      tf_data.user_data = "$Hello";
      tf_data.calltf    = sys_hello;//call address
      tf_data.compiletf = 0;
      vpi_register_systf(&tf_data);
簡単ですね。VPIの登録方法は、2種類しかありません。つまり、
- vpi_register_cb
- vpi_register_systf
です。vpi_register_systf で登録される関数は、verilog ソース中のtaskや、functionと同じ種類のもので分かりやすいと思います。
(systfのtfは、taskやfunctionという意味だと思います。) Verilogでは、書けない、または、書けない事はないが、他の言語で書いた方が速いとか、何らかの処理をまとめて置き換えるものではないかと思います。
これに対して、vpi_register_cb は、コールバックで、少し複雑ですので、さらに例で見ていきましょう。
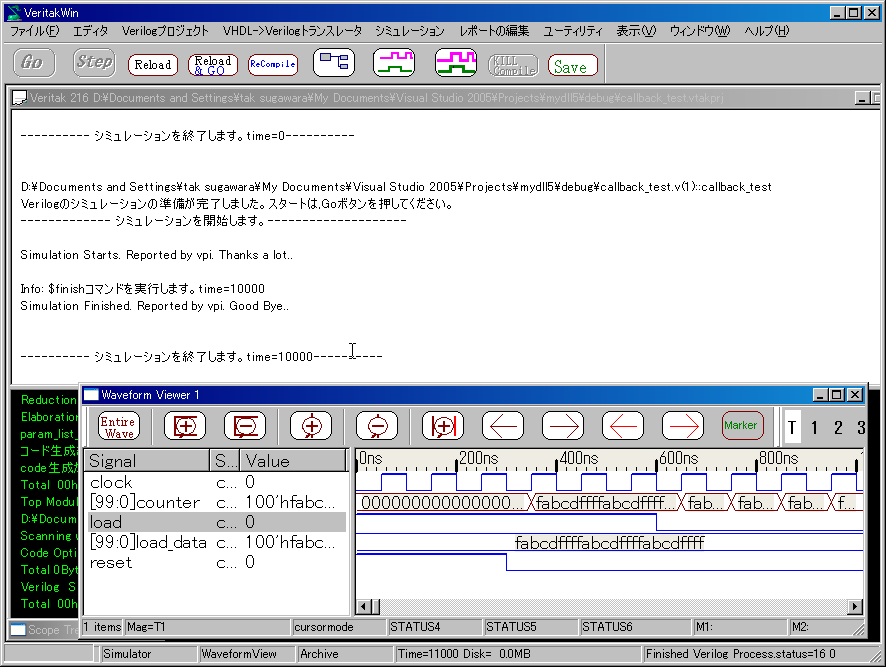
7.2.3 callback_test.vtakprj
このプロジェクトでは、波形にご注目ください。
このソースは、
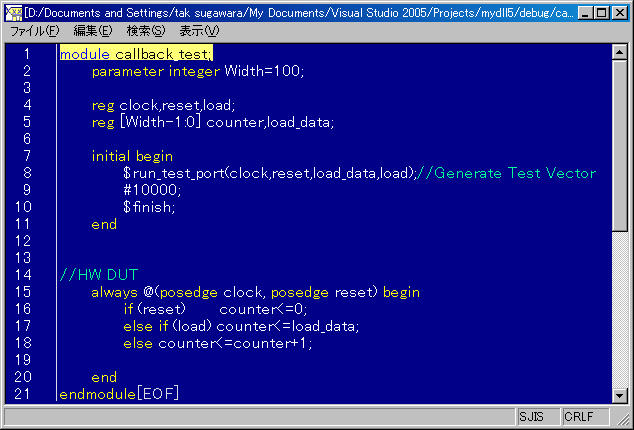
です。
clock ,reset,load,data_load の信号は動いていますが、記述中には見当たりません。
これは、テストベンチの駆動がVPI側で行われているからです。しかし、$run_test_port
は、通常のtask callに近いもののはずです。ですから、呼び出した後でも波形が動くためには、このファンクション処理以外にVPI側でなにかしていないと説明ができません。
どうやっているか興味がありますね。
vpi_register_systfで登録されたrun_test_port 関数に飛んで来たとします。
最初の障害は、引数の受け取り方です。ちょっと特殊なので、次の3行を定型として覚えてしまいます。
全て、引数はvpiHandleという型で受け取りますが、ハンドルとは、なにか分かりづらいと思います。Veritakでのハンドルの実体は、アドレスです。(C言語ならvoid*) です。
 systfref = vpi_handle(vpiSysTfCall, NULL); /* シミュレータさん。今、呼び出した人のアドレスをください。get system function that invoked C routine */
  argsiter = vpi_iterate(vpiArgument, systfref);/*呼び出した人さんへ、引数のイタレータ(STLのVectorだと思ってもよいでしょう。一種のリストです)を作成してください。 get iterator (list) of passed arguments */
  argh = vpi_scan(argsiter);/*イタレータさん、引数を一つください。 get the one argument - add loop for more args */
ここで、最初の引数は、argh に入っています。次の引数を受け取りたいときは、もう一度、
argl = vpi_scan(argsiter);
とすれば、次の引数がargl に入ります。同様にして、NULLが返ってくるまで任意個数の引数を受け取れます。
Tips:
専門的になりますが、argsiter のメモリの開放は、シミュレータが持っている引数とscanの個数が一致していれば、シミュレータ側でやりますので、開放しなくてもよいです。しかし、引数個数分のscanをしないで、次回、処理をするとイタレータのメモリは開放されず、メモリリークとなり長時間のシミュレーションでは、問題が生じます。そこで、サンプルみたいに、最後がNULLで終わっていなけば、vpi_free_objectで開放する、と決めておいた方がよいかもしれません。なお、NULLが返ったあとは、もうオブジェクトは破棄されているので、アクセスはできません。NULLの後にscanするのは、illegal
です。
下のソースでは、引数の変数がreg タイプであることを確認し、それぞれの信号に対して処理内容を分けています。
引数に値を設定してやるには?
最初のclock の場合は、1ビットであることは、明白なので、1ビット専用のscalar
で戻してやります。
値の設定の仕方は、次の3行が定石です。
value.value.scalar=vpi0;//値を設定
value.format=vpiScalarVal;//タイプを設定
vpi_put_value(argh, &value, NULL, vpiNoDelay);//書く。つまり clock=0;
これが、整数の場合は、
value.value.integer=0;//値を設定(ZX はなし)
value.format=vpiIntVal;//タイプを設定
vpi_put_value(argh, &value, NULL, vpiNoDelay);//書く。つまり clock=0;
にすればよいです。integer は、32ビットまでなので、それより大きいビット数の場合は、
最初にビット幅を求め、32ビット単位で設定してやります。
 unsigned wwid = vpi_get(vpiSize, argh);
                        value.format=vpiVectorVal;
                        unsigned words=(wwid+31)/32;
                        value.value.vector =(t_vpi_vecval*) calloc(words, sizeof(s_vpi_vecval));//
                        for (unsigned i=0;i<words;i++){
                                value.value.vector[i].aval=0xabcdffff;//Initialize abcdffff as initial counter value
                                value.value.vector[i].bval=0;
                        }
                        vpi_put_value(argh, &value, NULL, vpiNoDelay);//write load_data=xx;
                        free(value.value.vector);//free vector
で、メモリを確保して設定してやります。なお、構造体の定義は、vpi_user.h を参照してください。
さて、本題のcallback ですが、上の波形では、load,reset,clock が変化していますので、それぞれ、cbAfterDelayで、Delay時間後のコールバックを予約してやります。なお、時刻0の設定は上で終わっています。
static int run_test_port(char*  name)
{

 vpiHandle systfref, argsiter, argh;

  s_vpi_value value;

  systfref = vpi_handle(vpiSysTfCall, NULL); /* get system function that invoked C routine */
  argsiter = vpi_iterate(vpiArgument, systfref);/* get iterator (list) of passed arguments */


  vpiHandle clock_handle=0;
  vpiHandle load_handle=0;
  vpiHandle reset_handle=0;

  for (unsigned i=0;i<4;i++){
                argh = vpi_scan(argsiter);/* get the one argument - add loop for more args */
                if(!argh){
                                vpi_printf("$VPI run_test_port: missing parameter. \n");
                                 vpi_sim_control(vpiFinish, 1);//パラメータがない、プログラムエラーで終了

                                  return 0;

                        }
                string str=vpi_get_str(vpiName,argh);//引数の名前を受け取る
                if(vpi_get(vpiType, argh) !=vpiReg){//variable type の変数でないと駄目
                          vpi_printf("$VPI Error:run_test_port requires variable type of parameter.\n");
                          vpi_sim_control(vpiFinish, 1);
                          return 0;
                }
                if (!str.compare("clock")) {//クロックだったら、

                        value.value.scalar=vpi0;
                        value.format=vpiScalarVal;
                        vpi_put_value(argh, &value, NULL, vpiNoDelay);//write clock=0;
                        clock_handle=argh;//for save
                }else if (!str.compare("reset")){//リセットだったら
                        value.value.scalar=vpi1;
                        value.format=vpiScalarVal;
                        vpi_put_value(argh, &value, NULL, vpiNoDelay);//write reset=1;
                        reset_handle=argh;
                }else if (!str.compare("load")){//load だったら
                        value.value.scalar=vpi1;
                        value.format=vpiScalarVal;
                        vpi_put_value(argh, &value, NULL, vpiNoDelay);//write load=0;
                        load_handle=argh;
                }else if(!str.compare("load_data")){//load_data だったら
                        unsigned wwid = vpi_get(vpiSize, argh);
                        value.format=vpiVectorVal;
                        unsigned words=(wwid+31)/32;
                        value.value.vector =(t_vpi_vecval*) calloc(words, sizeof(s_vpi_vecval));//
                        for (unsigned i=0;i<words;i++){
                                value.value.vector[i].aval=0xabcdffff;//Initialize abcdffff as initial counter value
                                value.value.vector[i].bval=0;
                        }
                        vpi_put_value(argh, &value, NULL, vpiNoDelay);//write load_data=xx;
                        free(value.value.vector);//free vector
                }
        }
  if (!load_handle || !reset_handle || !clock_handle) {
            //パラメータが全て揃ったことを確認する
      vpi_printf("$VPI Error:run_test_port some parameter is missing.\n");
            vpi_sim_control(vpiFinish, 1);
            return 0;
  }

        if(argh) vpi_free_object(argsiter);//メモリを開放

//Reserve next clock cycle
      struct t_vpi_time time;
      time.type = vpiSimTime;
      time.high = 0;
      time.low = CLOCK_HALF_CYCLE;
          struct t_cb_data cb;

      cb.reason = cbAfterDelay;//ディレイ時間後にコールバックを予約
      cb.cb_rtn = clock_iterator;//next callback address
      cb.time = &time;
      cb.obj = clock_handle;
      cb.value = 0;
      cb.user_data = 0;
      vpi_register_cb(&cb);

//Reserve  reset=0 after CLOCK_HALF_CYCLEx5
      time.type = vpiSimTime;
      time.high = 0;
      time.low = CLOCK_HALF_CYCLE*6;

      cb.reason = cbAfterDelay;//ディレイ時間後にコールバックを予約
      cb.cb_rtn = load_iterator;//next callback address
      cb.time = &time;
      cb.obj = reset_handle;
      cb.value = 0;
      cb.user_data = 0;
      vpi_register_cb(&cb);


//Reserve  load=0 after CLOCK_HALF_CYCLEx11
          time.type = vpiSimTime;
      time.high = 0;
      time.low = CLOCK_HALF_CYCLE*12;

      cb.reason = cbAfterDelay;//ディレイ時間後にコールバックを予約
      cb.cb_rtn = load_iterator;//next callback address
      cb.time = &time;
      cb.obj = load_handle;
      cb.value = 0;
      cb.user_data = 0;
      vpi_register_cb(&cb);


        return(0);

 }
クロックのコールバックです。クロックは、always #50 clock=~clock; の動作が必要なので、
コールバックされたら、値を反転し、再度、自分自身を予約してやればよいです。
load とresetについては、もう値の変化は必要ないので、予約は不要です。
値を得るには
vpi_put_value は、ライトファンクションですが、vpi_get_valueは、リードです。
 s_vpi_value value;
  value.format = vpiScalarVal;
  vpi_get_value(new_cb.obj, &value);
以上で、テストベクタをプログラムで書くことができました。 verilog HDL なら、1行もかからない文が、VPIで書くと面倒ですね。ただ、外部から動的に駆動制御される場合は、どうしてもこの機構がないとVerilog HDLと外部とのインターフェースができません。 面倒な手続きや、複雑に見える構造体も、よく考えられていてこれ以上簡単にするのは、難しいと思います。
このVPIというのは、Verilog 2001になってからのPLIですが、前のVersionのPLIに比べてファンクションの機能の抽象化が図られていて、iterateや、scan、get*、put*などの一般化したファンクションで呼んで、数百種類あるPLIのファンクションの数を少なくしようという意図が感じられます。なお、前のVersionのPLIは、保守扱いになっているので、これから、外部プログラムを書かれる場合は、VPIをお勧めします。VPIは、前のVersionのtf_xxや、acc_xxのsupersetになっています。
#define CLOCK_HALF_CYCLE 50

static int clock_iterator(p_cb_data cb)
{

//Reserve next clock cycle
      struct t_vpi_time time;
      time.type = vpiSimTime;
      time.high = 0;
      time.low = CLOCK_HALF_CYCLE;
      struct t_cb_data new_cb;

      new_cb.reason = cbAfterDelay;
      new_cb.cb_rtn = clock_iterator;
      new_cb.time = &time;
      new_cb.obj = cb->obj;

      new_cb.value=0;
      new_cb.user_data = 0;
      vpi_register_cb(&new_cb);

        s_vpi_value value;
        value.format = vpiScalarVal;
        vpi_get_value(new_cb.obj, &value);
        value.value.scalar ^=1;//
        vpi_put_value(cb->obj, &value, NULL, vpiNoDelay);//write inverted value clock=~clock;
        return 0;
}

static int load_iterator(p_cb_data cb)
{

        s_vpi_value value;
        value.format = vpiScalarVal;
        value.value.scalar =vpi0;
        vpi_put_value(cb->obj, &value, NULL, vpiNoDelay);//write inverted value clock=~clock;
        return 0;
}
7.2.4 cbReadOnlySynch_sample.vtakprj
次のプロジェクトもコールバックに関するものです。
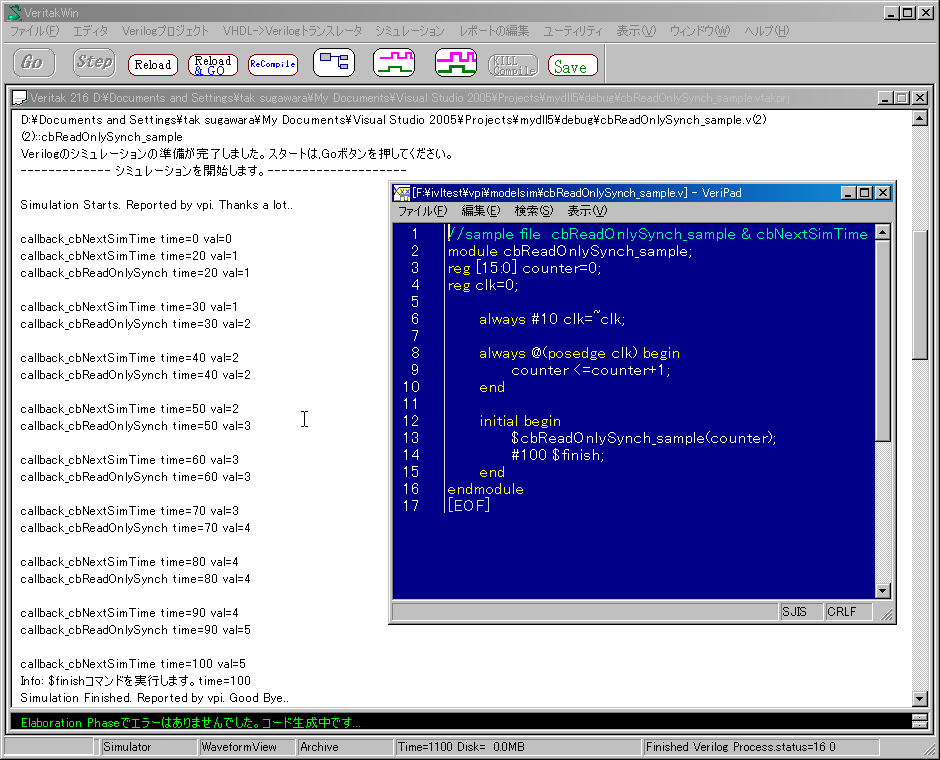
まずは、$cbReadOnly_sample のソースを見てみます。
今度のポイントは、cbReadOnlySynch です。これは、タイムスロットの内、もう変化は起こらない、次のタイムスロットに行く直前にコールバックされます。これでなにか便利かというと、その時刻の最終値をモニタできる、ことです。$strobeというのがありますが、実は、このcbReadOnlySynch を使って書けます。
static int next_time_cbReadOnlySynch_sample(char*name)
{
vpiHandle systfref, argsiter, argh;

  s_vpi_value value;

  systfref = vpi_handle(vpiSysTfCall, NULL); /* get system function that invoked C routine */
  argsiter = vpi_iterate(vpiArgument, systfref);/* get iterator (list) of passed arguments */


   argh = vpi_scan(argsiter);/* get the one argument - add loop for more args */


   if(argh){
          struct t_cb_data cb;
          s_vpi_time  time;

          time.type = vpiSimTime;
      time.high = 0;
      time.low = 0;

      cb.reason = cbReadOnlySynch;
      cb.cb_rtn = callback_cbNextSimTime;//next callback address
      cb.time = &time;
      cb.obj = argh;
      cb.value = 0;
      cb.user_data = 0;
      vpi_register_cb(&cb);

   }
        return 0;
}
次のコールバックアドレスでは、cbNextSimTime で自分自身をコールバックしています。これは、次の時刻のタイムスロットへのコールバックを意味します。こうして、時刻が変化したときのカウンタの最終値をモニタできる、という例になっています。
static int callback_cbNextSimTime(p_cb_data cb)
{

        s_vpi_time  now;
    s_vpi_value value;
        value.format = vpiIntVal;
        vpi_get_value(cb->obj, &value);

    now.type = vpiSimTime;
    vpi_get_time(0, &now);
        vpi_printf("callback_cbNextSimTime time=%d val=%d\n",now.low,value.value.integer);

    struct t_cb_data new_cb;
        new_cb.reason = cbNextSimTime;
    new_cb.cb_rtn = callback_cbNextSimTime;//next callback address
    new_cb.time = 0;
    new_cb.obj = cb->obj;
    new_cb.value = 0;
    new_cb.user_data = 0;
    vpi_register_cb(&new_cb);


        struct t_cb_data new1_cb;
        new1_cb.reason = cbReadOnlySynch;
    new1_cb.cb_rtn = callback_cbReadOnlySynch;//next callback address
    s_vpi_time  now1;
        now1.type = vpiSuppressTime;
        now1.low=0;
        now1.high=0;

    new1_cb.time = &now1;//s_vpi_time definition is must.
    new1_cb.obj = cb->obj;
    new1_cb.value = 0;
    new1_cb.user_data = 0;
    vpi_register_cb(&new1_cb);

        return 0;
}
7.2.5 print_nets
次の例は、解析的にVerilog HDLのソースの構造を出力する例です。
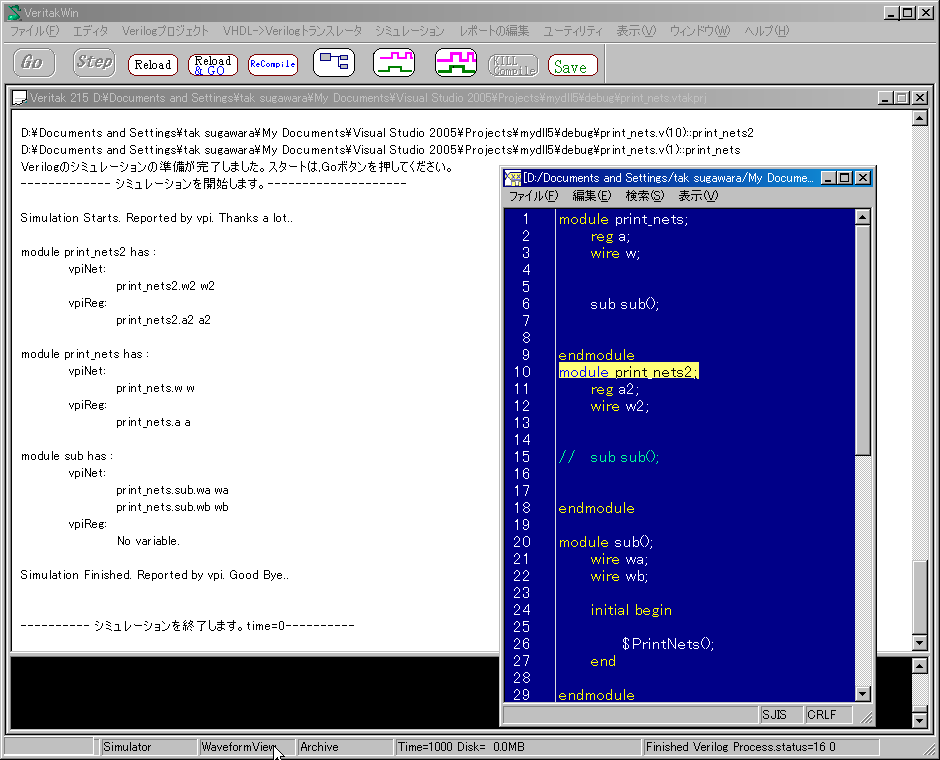
注意点として、データを受け取る場合ファンクションの場合(vpi_get_str,vpi_get_value等) シミュレータ側で、メモリは確保されますが、それは、次回も使いまわしされるので、受け取ったらすぐにコピーして使うようにします。
static void print_net_in_module(vpiHandle module_handle)
{
        char* module_name   = vpi_get_str(vpiName, module_handle);
        vpi_printf("module %s has :\n",module_name);
        //vpiNet
    vpiHandle net_iterator=vpi_iterate(vpiNet,module_handle);
        vpi_printf("    vpiNet:\n");
        if(net_iterator){
                while( vpiHandle netHandle = vpi_scan(net_iterator)){
                        string NetFullName = vpi_get_str(vpiFullName, netHandle);//prepare another string buffer for another vpi operation
                        string NetName=vpi_get_str(vpiName,netHandle);//prepare another string buffer for another vpi operation
                        vpi_printf("            %s %s\n",NetFullName.c_str(),NetName.c_str());

                        //Check by vpi_handle_by_name function

                        vpiHandle net= vpi_handle_by_name(const_cast<char*>(NetFullName.c_str()),(vpiHandle) NULL);
                        string  NetFullName2=vpi_get_str(vpiFullName,net);
                        if (NetFullName.compare(NetFullName2)){
                                assert(0);
                        }
                }
        }else {
                vpi_printf("            No nets.\n");
        }

        {//vpiReg
         vpiHandle net_iterator=vpi_iterate(vpiReg,module_handle);
         vpi_printf("   vpiReg:\n");
         if(net_iterator){
                while( vpiHandle netHandle = vpi_scan(net_iterator)){
                        string NetFullName = vpi_get_str(vpiFullName, netHandle);
                        string NetName=vpi_get_str(vpiName,netHandle);
                        vpi_printf("            %s %s\n",NetFullName.c_str(),NetName.c_str());

                }
         }else {
                vpi_printf("            No variable.\n");
         }
        }

        vpi_printf("\n");
}
static int printModules(char *){

     vpiHandle topModIterator;
     vpiHandle topModHandle;


     /* create a module iterator that starts at the top  as indicated by NULL */
     topModIterator = vpi_iterate(vpiModule,NULL);

     if( !topModIterator ){
                return 0;
     }

     /* use vpi_scan to iterate throught modules */
     while( topModHandle = vpi_scan(topModIterator)){
                print_net_in_module(topModHandle);
                vpiHandle module_iterator=vpi_iterate(vpiModule,topModHandle);
                if (module_iterator){
                        vpiHandle module_handle;
                        while (module_handle=vpi_scan(module_iterator)){
                                print_net_in_module(module_handle);
                        }
                }
        }
        return 0;
}
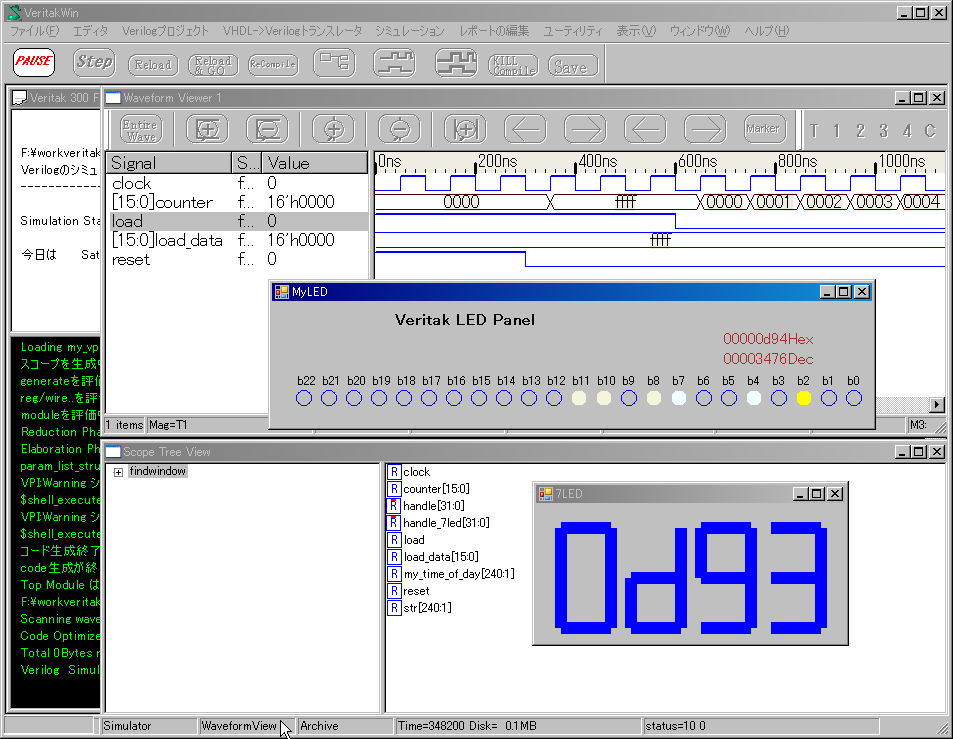
7.2.6 my_findwindow
次は、ちょっとお遊びです。LEDチカチカと7セグメントLEDの駆動ををシミュレータ上で行うことができます。
VPIの使い道
たとえば、$GetTimeofDay のようにちょっとした小物ファンクションでも、ある場合には便利です。テスト開始、終了日時をファイルに書き込んだり、出来上がったテストファイルをシミュレーションが終わったら、自動的に転送したり、とVPIを使えば、それこそ無限の使い方ができるようになります。 Verilog
2001 のVPIは、System Verilogになってもそのまま使えますし、勿論ベンダーを選びません。Veritak
でやっているようにリニアシステムシミュレータを組み込むこともできます。
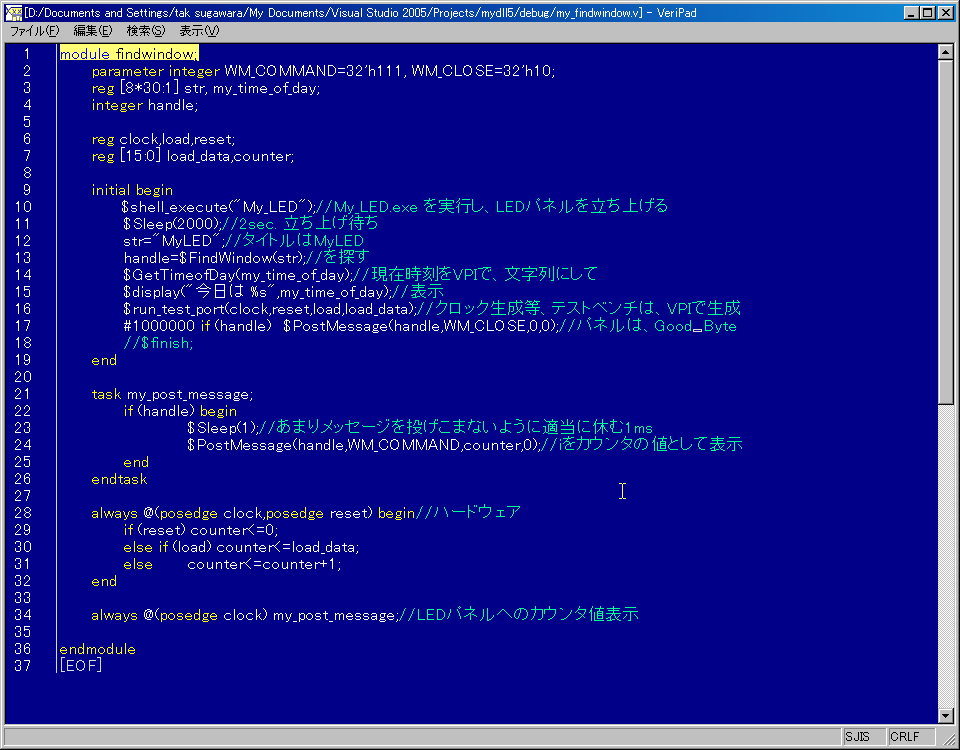
ソースです。
//32bit 専用
static int sys_systems_size_tf(PLI_BYTE8*)//Aug.42003
{
        return 32;
}


static int sys_system_calltf(char*  name)
{

 vpiHandle systfref, argsiter, argh;
  t_vpi_value value;


                 systfref = vpi_handle(vpiSysTfCall, NULL); /* get system function that invoked C routine */
                 argsiter = vpi_iterate(vpiArgument, systfref);/* get iterator (list) of passed arguments */
                 argh = vpi_scan(argsiter);/* get the one argument - add loop for more args */
             if(!argh){
                          vpi_printf("$VPI missing parameter.\n");
                          return 0;
                 }

                value.format = vpiStringVal;
        vpi_get_value(argh, &value);
        char *s = value.value.str;

                 int result=system(s);//Do command on DOS!

                 value.value.integer =result;
                 value.format = vpiIntVal;/* return the result */

                 vpi_put_value(systfref, &value, NULL, vpiNoDelay);
                 vpi_free_object(argsiter);

                return(0);

 }
 static int sys_shell_execute_calltf(char*  name)
{

 vpiHandle systfref, argsiter, argh;
  t_vpi_value value;


                 systfref = vpi_handle(vpiSysTfCall, NULL); /* get system function that invoked C routine */
                 argsiter = vpi_iterate(vpiArgument, systfref);/* get iterator (list) of passed arguments */
                 argh = vpi_scan(argsiter);/* get the one argument - add loop for more args */
             if(!argh){
                          vpi_printf("$VPI missing parameter.\n");
                          return 0;
                 }

                value.format = vpiStringVal;
        vpi_get_value(argh, &value);
        char *s = value.value.str;

                 //Do shell command on DOS!
                 int result=reinterpret_cast<int>(      ShellExecute(NULL, "open", s,
                   NULL, NULL, SW_SHOWNORMAL));
                 value.value.integer =result;//;
                 value.format = vpiIntVal;/* return the result */

                 vpi_put_value(systfref, &value, NULL, vpiNoDelay);
                 vpi_free_object(argsiter);

                return(0);

 }
 //Jun.11.2006
 static int sys_FindWindow_calltf(char*  name)
{

 vpiHandle systfref, argsiter, argh;
  t_vpi_value value;


                 systfref = vpi_handle(vpiSysTfCall, NULL); /* get system function that invoked C routine */
                 argsiter = vpi_iterate(vpiArgument, systfref);/* get iterator (list) of passed arguments */
                 argh = vpi_scan(argsiter);/* get the one argument - add loop for more args */
             if(!argh){
                          vpi_printf("$VPI missing parameter.\n");
                          return 0;
                 }

                value.format = vpiStringVal;
        vpi_get_value(argh, &value);
        char *s = value.value.str;
                while (*s==' '){//Skip space
                        s++;
                }


                 //Do shell command on DOS!
                 int result=reinterpret_cast<int>(FindWindow(NULL,s));
                 value.value.integer =result;//;
                 value.format = vpiIntVal;/* return the result */

                 vpi_put_value(systfref, &value, NULL, vpiNoDelay);
                 vpi_free_object(argsiter);

                return(0);

 }

 int sys_get_time_of_day(char*  name)
{

 vpiHandle systfref, argsiter, argh;
  t_vpi_value value;


                systfref = vpi_handle(vpiSysTfCall, NULL); /* get system function that invoked C routine */
                argsiter = vpi_iterate(vpiArgument, systfref);/* get iterator (list) of passed arguments */
                argh = vpi_scan(argsiter);/* get the one argument - add loop for more args */
            if(!argh){
                          vpi_printf("$VPI Error:sys_get_time_of_day.\n");
                          return 0;
                }
                if(vpi_get(vpiType, argh) !=vpiReg){
                          vpi_printf("$VPI Error:sys_get_time_of_day 1st parameter must be variable type.\n");
                          return 0;
                }
        unsigned wwid = vpi_get(vpiSize,argh);
        if (wwid%8!=0 || !wwid){
                         vpi_printf("$VPI Error:sys_get_time_of_day size of 1st parameter must be multiple of 8.\n");
                          return 0;

                }
                time_t timer;

                time(&timer);
                char buffer[27];
                ctime_s(buffer,27,&timer);//Get Local time. use new secure version

                value.format =vpiStringVal;//Put by string
                value.value.str=buffer;

                vpi_put_value(argh, &value, NULL, vpiNoDelay);
                return(0);

 }


 //Jun.11.2006
 static int sys_Sleep_calltf(char*  name)
{

 vpiHandle systfref, argsiter, argh;

s_vpi_value value;

                 systfref = vpi_handle(vpiSysTfCall, NULL); /* get system function that invoked C routine */
                 argsiter = vpi_iterate(vpiArgument, systfref);/* get iterator (list) of passed arguments */


                argh = vpi_scan(argsiter);/* get the one argument - add loop for more args */
                if(!argh){
                                vpi_printf("$VPI sys_Sleep_calltf: missing parameter. \n");
//                               vpi_sim_control(vpiFinish, 1);

                                  return 0;

                        }
                value.format = vpiIntVal;
                vpi_get_value(argh, &value);
                Sleep(value.value.integer);//Wait val msec

                if(argh) vpi_free_object(argsiter);

                return(0);

 }

//Jun.11.2006
 static int sys_PostMessage(char*  name)
{

 vpiHandle systfref, argsiter, argh;

  s_vpi_value value;

  systfref = vpi_handle(vpiSysTfCall, NULL); /* get system function that invoked C routine */
  argsiter = vpi_iterate(vpiArgument, systfref);/* get iterator (list) of passed arguments */

  unsigned message_parameter[4];
  for (unsigned i=0;i<4;i++){
                argh = vpi_scan(argsiter);/* get the one argument - add loop for more args */
                if(!argh){
                                vpi_printf("$VPI sys_PostMessage: missing parameter. \n");
//                               vpi_sim_control(vpiFinish, 1);

                                  return 0;

                        }

                value.format = vpiIntVal;
                vpi_get_value(argh, &value);
                message_parameter[i]=value.value.integer;
        }


        ::PostMessage(reinterpret_cast<HWND>(message_parameter[0]),//handle
                                  message_parameter[1],//WM_COMMAND
                                  message_parameter[2],//WPARAM
                                  message_parameter[3]);//LPARAM


                if(argh) vpi_free_object(argsiter);

                return(0);

 }
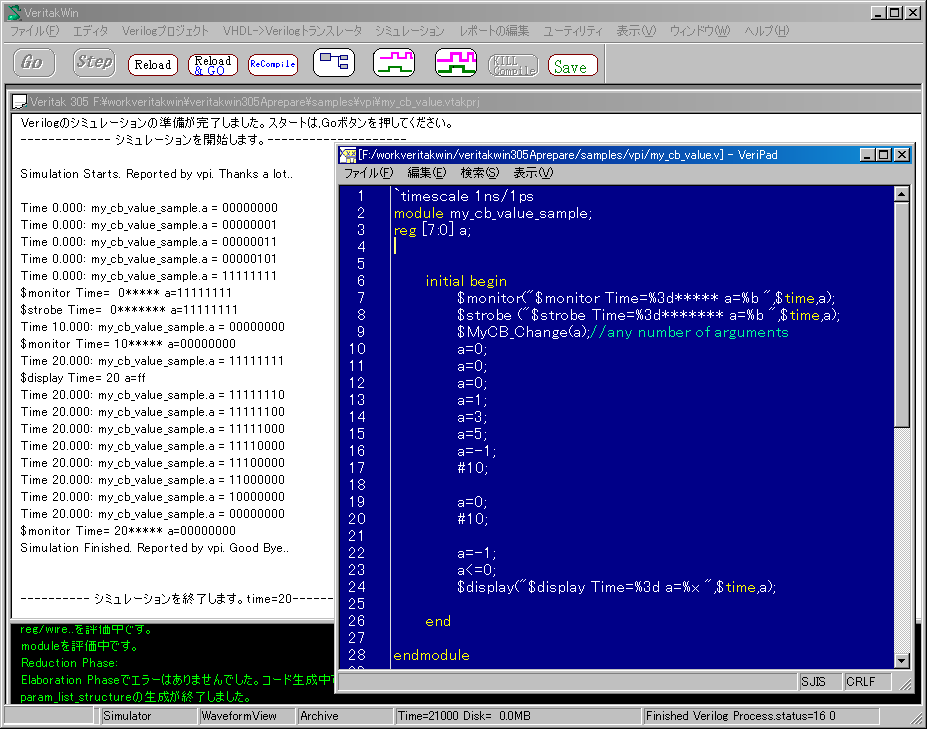
7.2.7 my_cb_value
$monitor もどきを作ってみましょう。$MyCB_ChangeがVPIで作成したファンクションです。$monitor,
$strobe, $display 等ありますが、いずれも、変数aの値を表示します。Time..で始まる部分が今回作成したファンクションです。aの値が変化したときに出力しています。
・$monitor との違い
$monitor も値の変化を出力していますが、それは、そのタイムスロットの一番最後(同時刻の最終確定値)だけです。それに対して、今回作成したファンクションでは、aの値の変化に応じて出力しています。
・$strobe との違い
$strboeは、$displayと同様ですが、そのタイムスロットの一番最後(同時刻の最終確定値)を出力する点が違います。
VPIソースです。
登録部です。
    tf_data.type      = vpiSysTask;
      tf_data.tfname    = "$MyCB_Change";
      tf_data.calltf    = my_cb_change;
      tf_data.compiletf = 0;
      tf_data.sizetf    = 0;
      vpi_register_systf(&tf_data);
ファンクション部です。
任意個数の引数をHDLソースから受け取りcbValueChangeでコールバックを登録します。cbValueChange ではvalue や、time構造体のポインタをセットしておきます。これは、シミュレータ側でCOPYしているので、スタックオブジェクトで構いません。しかしながら、user_dataは、ユーザ側で確保してください。
static int my_cb_change(char*  name)//Jul.19.2006
{

 vpiHandle systfref, argsiter, argh;

  s_vpi_value value;

  systfref = vpi_handle(vpiSysTfCall, NULL); /* get system function that invoked C routine */
  argsiter = vpi_iterate(vpiArgument, systfref);/* get iterator (list) of passed arguments */

  while (argh = vpi_scan(argsiter)){    /* get the one argument - add loop for more args */
      unsigned type=vpi_get(vpiType,argh);
          if (type !=vpiReg && //
                  type !=vpiNet &&
                  type !=vpiIntegerVar &&
                  type !=vpiTimeVar//
                  ) {
                        vpi_printf("invalid arguments in $my_monitor.%d\n",type);
                         vpi_sim_control(vpiFinish, 1);
          }
      struct t_cb_data cb;
          s_vpi_time  now;

      now.type       = vpiScaledRealTime;//コールバックされた時刻は、Real型でください
      value.format    = vpiBinStrVal;//2進文字列ででください
      cb.reason = cbValueChange;
      cb.cb_rtn = my_cb_1;//コールバックアドレス next callback address
      cb.time = &now;
      cb.obj = argh;
      cb.value = &value;
          char* net_name = vpi_get_str(vpiFullName, argh);
      cb.user_data = strdup(net_name);//allocate and copy
      vpi_register_cb(&cb);

  }
        return(0);

 }
コールバック部です。時刻と名前、文字列にした値を受け取り、表示します。
static int my_cb_1(p_cb_data cb)
{

       vpi_printf("Time %5.3f: %s = %s\n",
             cb->time->real,
             cb->user_data,
             cb->value->value.str);
      return 0;
}
cbValueChange で注意する点は、同時刻での変化の仕方です。同時刻最終値は同じになりますが、最終値にいたる遷移中の値は、シミュレータ毎に異なることに注意してください。これは、同一シミュレータの異なるVersion及び、シミュレータの内部オプティマイズでも変わってきます。下は、Fast
ModeをOnにしたときの実行結果です。時刻最終値は、同じですが、遷移数が少なくなっています。
F:\workveritakwin\veritakwin305Aprepare\samples\vpi\my_cb_value.v(2)::my_cb_value_sample
Verilogのシミュレーションの準備が完了しました。スタートは,Goボタンを押してください。
------------- シミュレーションを開始します。--------------------

Simulation Starts. Reported by vpi. Thanks a lot..

Time 0.000: my_cb_value_sample.a = 00000000
Time 0.000: my_cb_value_sample.a = 00000001
Time 0.000: my_cb_value_sample.a = 00000011
Time 0.000: my_cb_value_sample.a = 00000101
Time 0.000: my_cb_value_sample.a = 11111111
$monitor Time=  0***** a=11111111
$strobe Time=  0******* a=11111111
Time 10.000: my_cb_value_sample.a = 00000000
$monitor Time= 10***** a=00000000
Time 20.000: my_cb_value_sample.a = 11111111
$display Time= 20 a=ff
Time 20.000: my_cb_value_sample.a = 00000000
$monitor Time= 20***** a=00000000
Simulation Finished. Reported by vpi. Good Bye..


---------- シミュレーションを終了します。time=20----------
TIPS:
さて$monitorと同じ動作にしたい場合は、どうしたらよいでしょうか? それは、cbValueChange で値の変化を受けたら、
さらにcbReadOnlySynchで飛ばして、値を取得すれば、値の最終値のみを表示することができます。
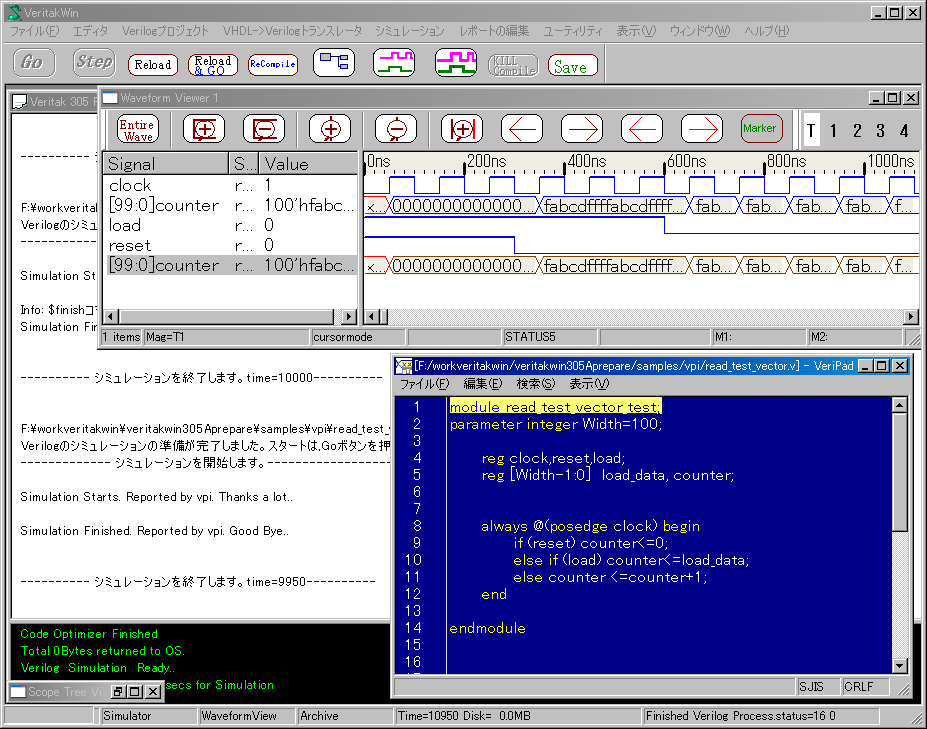
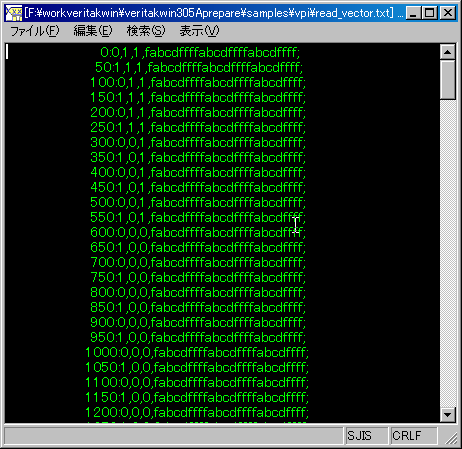
7.2.8 read_test_vector
ファイルからテストベクタを読んで、VPIで値をセットしてみましょう。
実行結果とHDLソースです。7.2.3 callback_test.vtakprj と同じようなソースと結果ですが、今回は、$xxで呼んでいません。
そのままで、合成可能な純ハード記述になっています。これにどうやって値をセットしているのでしょうか?
実は、7.2.3のHDLソースにの次のソースを追加して、テストベクタをファイルに落としました。それをVPIで読んでセットしていた訳です。
ソースの追加部です。
//For Later use
        integer fp;
        initial begin
                fp=$fopen("read_vector.txt","w");
        end
        always @(posedge clock,negedge clock) begin
                $fdisplay(fp,"%d:%b,%b,%b,%h;",$time,clock,reset,load,load_data);

        end
落としたファイルは、こんな感じです。
今回製作した、
登録部です。
   cb_data.reason = cbStartOfSimulation;
      cb_data.cb_rtn = my_read_test_vector;
      cb_data.user_data = 0;
      tf_data.compiletf = 0;
      tf_data.sizetf    = 0;
      vpi_register_cb(&cb_data);//register callback
本体です。
ちょっとソースは長いですが、ポイントは、vpi_put_value で、時刻情報をセットしてやることだけです。なお、時刻は、相対時刻です。(時刻0でセットする分には、=絶対時刻になります。)
int my_read_test_vector(p_cb_data cb_data)//Jul.24.2006
{
        vpiHandle topModIterator;
        vpiHandle topModHandle;
    s_vpi_vlog_info  options_s;
        s_vpi_value value;

        bool go_this_routine=false;
        bool debug=false;
    vpi_get_vlog_info(&options_s);
        for (unsigned i=1; i<options_s.argc; i++) {
                string temp=options_s.argv[i];
        if (strcmp(options_s.argv[i], "+DEBUG_VPI") == 0) {
                debug = true; ///flag on

        }
                if (strcmp(options_s.argv[i], "+READ_TEST_VECTOR") == 0) {
                go_this_routine = true; ///flag on

        }

        }
        if (!go_this_routine) return 0;//Stop further processing if +READ_TEST_VECTOR is not defined at command line. See "Edit Display" of the project


        /* create a module iterator that starts at the top  as indicated by NULL */
     topModIterator = vpi_iterate(vpiModule,NULL);

     if( !topModIterator ){
                return 0;
     }

     /* use vpi_scan to iterate throught modules */
     topModHandle = vpi_scan(topModIterator);
         if (!topModHandle) return 0;
         string top_module_name=vpi_get_str(vpiDefName,topModHandle);

         if (debug) {
                vpi_printf("Top module name=%s\n",top_module_name.c_str());
         }


         string clock=top_module_name;
         clock+=".";
         clock+="clock";
         vpiHandle clock_handle=vpi_handle_by_name((char*)clock.c_str(),topModHandle);
         if (!clock_handle){
                vpi_printf("Missing =%s\n",clock.c_str());
                return 0;
         }

         string load=top_module_name;
         load+=".";
         load+="load";
         vpiHandle load_handle=vpi_handle_by_name((char*)load.c_str(),topModHandle);
         if (!load_handle){
                vpi_printf("Missing =%s\n",load.c_str());
                return 0;
         }

         string load_data=top_module_name;
         load_data +=".";
         load_data+="load_data";
         vpiHandle load_data_handle=vpi_handle_by_name((char*)load_data.c_str(),topModHandle);
         if (!load_data_handle){
                vpi_printf("Missing =%s\n",load_data.c_str());
                return 0;
         }

         string reset=top_module_name;
         reset +=".";
         reset +="reset";
         vpiHandle reset_handle=vpi_handle_by_name((char*)reset.c_str(),topModHandle);
         if (!reset_handle){
                vpi_printf("Missing =%s\n",reset.c_str());
                return 0;
         }
         string file_name="read_vector.txt";
         FILE* fp=fopen(file_name.c_str(),"r");
         if (!fp) {
                vpi_printf("Missing=%s\n",file_name.c_str());
         }
         char buffer[1000];
         string o_clock,o_reset,o_load,o_load_data;
         while (1) {
                if(fgets(buffer,1000,fp) ==NULL) break;
                char clock_char[4];
                char reset_char[4];
                char load_char[4];
                char load_data_char[100];
                unsigned t;
                sscanf(buffer,"%d:%[^','],%[^','],%[^','],%[^';']",&t,clock_char,reset_char,load_char,load_data_char);//Use delimiter

                if (debug) {
                        vpi_printf("%s\n",buffer);
                }

                string clock_str=clock_char;
                string reset_str=reset_char;
                string load_str=load_char;
                string load_data_str=load_data_char;

                s_vpi_time       time_s;

                time_s.type      = vpiSimTime;//セット時刻を設定
                time_s.low       = t;//セット時刻
                time_s.high      = 0;

                if (clock_str.compare(o_clock)){//Only changed value makes scheduling.No changed value makes no scheduling.
                                o_clock=clock_str;
                                value.format = vpiBinStrVal;
                                value.value.str =clock_char;
                                vpi_put_value(clock_handle, &value, &time_s, vpiTransportDelay);

                }
                if (reset_str.compare(o_reset)){
                                o_reset=reset_str;

                                value.format = vpiBinStrVal;
                                value.value.str =reset_char;
                                vpi_put_value(reset_handle, &value, &time_s, vpiTransportDelay);

                }

                if (load_str.compare(o_load)){
                                o_load=load_str;
                                value.format = vpiBinStrVal;
                                value.value.str =load_char;
                                vpi_put_value(load_handle, &value, &time_s, vpiTransportDelay);

                }
                if (load_data_str.compare(o_load_data)){
                                o_load_data=load_data_str;
                                value.format = vpiHexStrVal;
                                value.value.str =load_data_char;
                                vpi_put_value(load_data_handle, &value, &time_s, vpiTransportDelay);

                }
         }
        return(0);

 }
短めのテストベクタでは、この方法が簡単でよいのですが、長めのテストベクタでは、問題があります。それは、時刻0で、全ての実行予約をしてしまうために、シミュレータ内で保持するキューイングデータが大きくなりすぎることです。
TIPS:
<名前からハンドルに変換するには>
vpi_handle_by_name を使います。
<ソースをいじらないで、違うパラメータで走らせたい>
vpi_get_vlog_infoを使います。上の例では、プロジェクト編集画面でREAD_TEST_VECTOR をPlusargしています。vpi_get_vlog_info でコマンドラインに与えられた引数をVPIで受け取ることができます。
<モジュール名を知りたい>
vpiDefName を使います。 vpiFullName は、フルインスタンス名, vpiName は、インスタンス名になります。
<値をセットする>
vpi_put_value を使います。セットするハンドルは、Variable型である必要があります。
<ポート情報を得るには、>
vpiPort を使います。 使い方は、インストールフォルダのsamples\vpi\mycosim\shared_class/shared_file.cppをご参照ください。
7.2.9 read_test_vector_long
7.2.8を改良して、長いテストベクタでも問題ないようにします。
登録部です。
 cb_data.reason = cbStartOfSimulation;
 cb_data.cb_rtn = my_read_test_vector_long;
 cb_data.user_data = 0;
 tf_data.compiletf = 0;
 tf_data.sizetf    = 0;
 vpi_register_cb(&cb_data);//register callback
本体です。テストベクタの読み出し時に次の次の行の読み出しの予約と、値のセットを行っています。 キューイングされるデータは、限定的になるため、テストベクタ長に制限はなくなります。
この実行で必要になる情報は、read_test_vector_work としてまとめ、ポインタをuser_dataにセットして情報を渡しています。
//work struct
struct read_test_vector_work {
         read_test_vector_work(){
                        fp=0;
                        debug=false;
                        previous_time.low=0;
                        previous_time.high=0;
                        previous_time.type=vpiSimTime;
         }

         struct handle_format{
                        vpiHandle handle;
                        int format;
                        string name;

         };


         FILE* fp;
         vector<handle_format> vpi_handles;
         bool debug;
         s_vpi_time  previous_time;

 };
int do_last_time_slot(p_cb_data cb_data)
{
         vpi_printf("Ending.. \n");
         vpi_sim_control(vpiFinish, 1);
         return 0;

}
void read_line(read_test_vector_work* work_ptr);

int Read_Next_line(p_cb_data cb_data)//Jul.24.2006
{
         read_test_vector_work* work_ptr=(read_test_vector_work* )(cb_data->user_data);
         read_line(work_ptr);
         return 0;
}

void read_line(read_test_vector_work* work_ptr)
{
        FILE* fp=work_ptr->fp;
        bool debug=work_ptr->debug;
    s_vpi_value value;
        s_cb_data        data_s;
    char buffer[1000];

        if(fgets(buffer,1000,fp) ==NULL) {

                data_s.reason    = cbReadOnlySynch;
                data_s.cb_rtn    = do_last_time_slot;
                data_s.obj       = 0;
                data_s.time      = 0;
                data_s.value     = 0;
                data_s.user_data = 0;
                vpi_register_cb(&data_s);
                return ;
        }
                char clock_char[4];
                char reset_char[4];
                char load_char[4];
                char load_data_char[100];
                unsigned t;
                sscanf(buffer,"%d:%[^','],%[^','],%[^','],%[^';']",&t,clock_char,reset_char,load_char,load_data_char);//Use delimiter

                if (debug) {
                        vpi_printf("%s\n",buffer);
                }


                s_vpi_time       time_s;

                time_s.type      = vpiSimTime;
                time_s.low       = t-work_ptr->previous_time.low;//Set relative time
                time_s.high      = 0;

                work_ptr->previous_time.low=t;

                for (unsigned i=0;i<  work_ptr->vpi_handles.size();i++){
                        value.format = work_ptr->vpi_handles[i].format;
                        switch (i) {
                                case(0):value.value.str =clock_char; break;
                                case(1):value.value.str =reset_char; break;
                                case(2):value.value.str =load_char; break;
                                case(3):value.value.str =load_data_char; break;
                                default: assert(0);
                        }

                        vpi_put_value(work_ptr->vpi_handles[i].handle, &value, &time_s, vpiTransportDelay);
                }


                /* schedule callback to this routine when time to read next vector */


  data_s.reason    = cbAfterDelay;
  data_s.cb_rtn    = Read_Next_line;
  data_s.obj       = 0;
  data_s.time      = &time_s;
  data_s.value     = NULL;
  data_s.user_data = reinterpret_cast<char *>(work_ptr);//
  vpi_register_cb(&data_s);

}
int my_read_test_vector_long(p_cb_data cb_data)//Jul.24.2006
{
        vpiHandle topModIterator;
        vpiHandle topModHandle;
    s_vpi_vlog_info  options_s;
        s_vpi_value value;

        bool go_this_routine=false;
        bool debug=false;
    vpi_get_vlog_info(&options_s);
        for (int i=1; i<options_s.argc; i++) {
                string temp=options_s.argv[i];
        if (strcmp(options_s.argv[i], "+DEBUG_VPI") == 0) {
                debug = true; ///flag on

        }
                if (strcmp(options_s.argv[i], "+READ_TEST_VECTOR_LONG") == 0) {
                go_this_routine = true; ///flag on

        }

        }
        if (!go_this_routine) return 0;//Stop further processing if +READ_TEST_VECTOR is not defined at command line. See "Edit Display" of the project


        /* create a module iterator that starts at the top  as indicated by NULL */
     topModIterator = vpi_iterate(vpiModule,NULL);

     if( !topModIterator ){
                return 0;
     }

     /* use vpi_scan to iterate throught modules */
     topModHandle = vpi_scan(topModIterator);
         if (!topModHandle) return 0;
         string top_module_name=vpi_get_str(vpiDefName,topModHandle);

         if (debug) {
                vpi_printf("Top module name=%s\n",top_module_name.c_str());
         }


         string clock=top_module_name;
         clock+=".";
         clock+="clock";
         vpiHandle clock_handle=vpi_handle_by_name((char*)clock.c_str(),topModHandle);
         if (!clock_handle){
                vpi_printf("Missing =%s\n",clock.c_str());
                return 0;
         }

         string load=top_module_name;
         load+=".";
         load+="load";
         vpiHandle load_handle=vpi_handle_by_name((char*)load.c_str(),topModHandle);
         if (!load_handle){
                vpi_printf("Missing =%s\n",load.c_str());
                return 0;
         }

         string load_data=top_module_name;
         load_data +=".";
         load_data+="load_data";
         vpiHandle load_data_handle=vpi_handle_by_name((char*)load_data.c_str(),topModHandle);
         if (!load_data_handle){
                vpi_printf("Missing =%s\n",load_data.c_str());
                return 0;
         }

         string reset=top_module_name;
         reset +=".";
         reset +="reset";
         vpiHandle reset_handle=vpi_handle_by_name((char*)reset.c_str(),topModHandle);
         if (!reset_handle){
                vpi_printf("Missing =%s\n",reset.c_str());
                return 0;
         }
         string file_name="read_vector.txt";
         FILE* fp=fopen(file_name.c_str(),"r");
         if (!fp) {
                vpi_printf("Missing=%s\n",file_name.c_str());
         }

         //Now initial check complete
        //Make some work area
        read_test_vector_work * work_ptr=new read_test_vector_work;
        work_ptr->fp=fp;
        read_test_vector_work::handle_format hf;

        hf.format=vpiBinStrVal;
        hf.name="clock";
        hf.handle=clock_handle;
        work_ptr->vpi_handles.push_back(hf);

    hf.format=vpiBinStrVal;
        hf.name="reset";
        hf.handle=reset_handle;
        work_ptr->vpi_handles.push_back(hf);

    hf.format=vpiBinStrVal;
        hf.name="load";
        hf.handle=load_handle;
        work_ptr->vpi_handles.push_back(hf);

    hf.format=vpiHexStrVal;
        hf.name="load_data";
        hf.handle=load_data_handle;
        work_ptr->vpi_handles.push_back(hf);

        read_line(work_ptr);

        return(0);

 }
7.2.10 スタートアップ
ところで、最初のスタートアップはどうすればよいでしょうか?それは、sys_tabl.cにあるvlog_startup_rontines に登録ルーチン(ここでは,sys_math_vpi_register) を登録すればよいのです。
 include  "vpi_user.h"

extern void sys_math_vpi_register(void);


__declspec(dllexport) void (*vlog_startup_routines[])() = {
      sys_math_vpi_register,// 登録ルーチンを書き加えていく。0がエンドマークになっている
      0 //エンドマーク
};
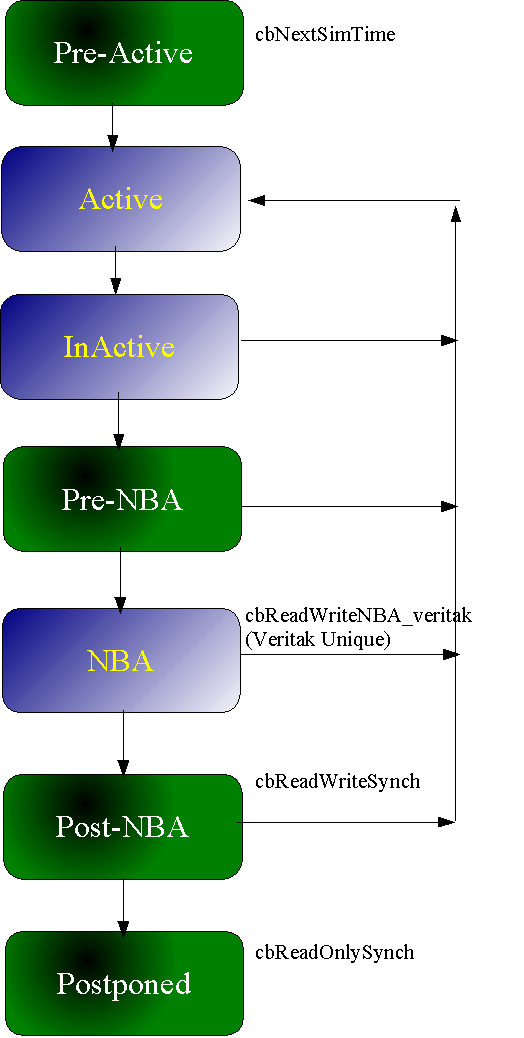
7.2.11 コールバック実装
Veritak のcbReadWriteSynchは、Non-Blocking Assignmentの後に起こります。
Veritak Uniqueコールバックで、cbReadWriteNBA_veritakは、NBA中に発生します。使い方は、インストールフォルダのsamples\vpi\mycosim\shared_class/shared_file.cppをご参照ください。
7.3 サポートコンパイラ
Visual C++ のみとします。
7.3.1準備
- C/C++ コンパイラ (Visual C++)
- ヘッダファイル vpi_user.h ( インストールパッケージ Version2.16以降のsamples\vpi\vpi_source
フォルダにあります)
- インポートライブラリファイル veritak2.lib(インストールパッケージ Version2.16以降のsamples\vpi\vpi_sourceフォルダにあります)
7.4 Visual C++ Express (無償版)を使う
7.4.1 Visual C++のインストール
製品版では、苦もなくDLLを作成することができますが、Express版は、そのままでは、DLLを作成できず、パッチを当てないと使えません。(環境を構築するまでが、かなり面倒です。)
全般の手順は、
http://msdn.microsoft.com/vstudio/express/visualc/usingpsdk/default.aspx
に書いてあります。
以下にポイントの手順を示します。(SDKとVisualC++は同じドライブ下としてください。)
Step 1) Platform SDK のインストール PSDK-x86.exeをダウンロード・インストールします。
Step 2) Visual C++ Expressのインストール
Step 3) Expressをインストールしたフォルダ下に、
Program Files\Microsoft Visual Studio 8\VC\VCProjectDefaults下にある
corewin_express.vsprops
をエディタで編集します。編集内容は、上記ページを参照してください。
Step 4) Microsoft Visual Studio 8\VC\VCWizards\AppWiz\Generic\Application\html\1xxx\ 下にある
AppSettings.htm
をエディタで4行コメントアウトします。コメントアウト箇所は、上記ページを参照してください。なお(1xxx)は、Versionらしく、数字は変わるみたいです。
ちなみに、1041(6月13日2006現在)では、536-539行目にありました。
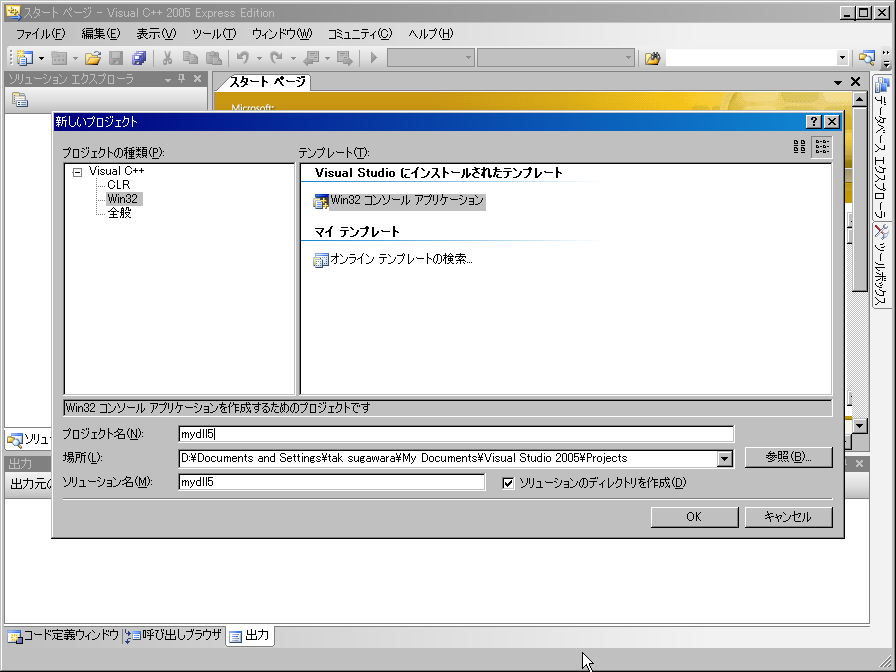
7.4.2 Visual C++プロジェクトの作成
起動します。ファイル->新規作成->プロジェクトで、プロジェクトを作成します。
プロジェクトは、Win32コンソールアプリケーションとします。プロジェクト名を適当に決めます。ここでは、「mydll5」にしました。
7.4.1のパッチが成功している場合は、「アプリケーションの設定」で、次のようにDLLを設定する○が出てくるので、設定し完了を押します。
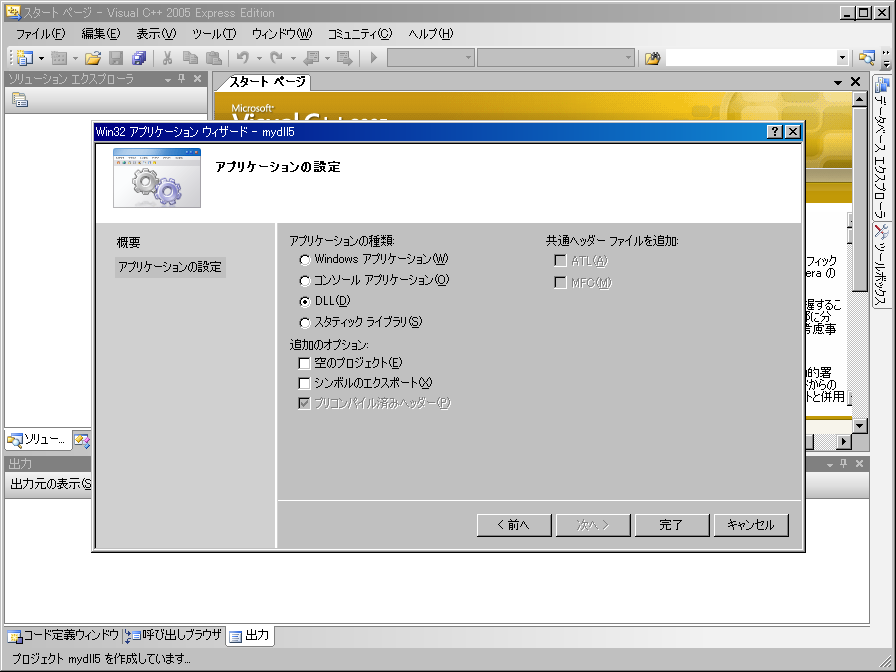
すると次のような画面になります。
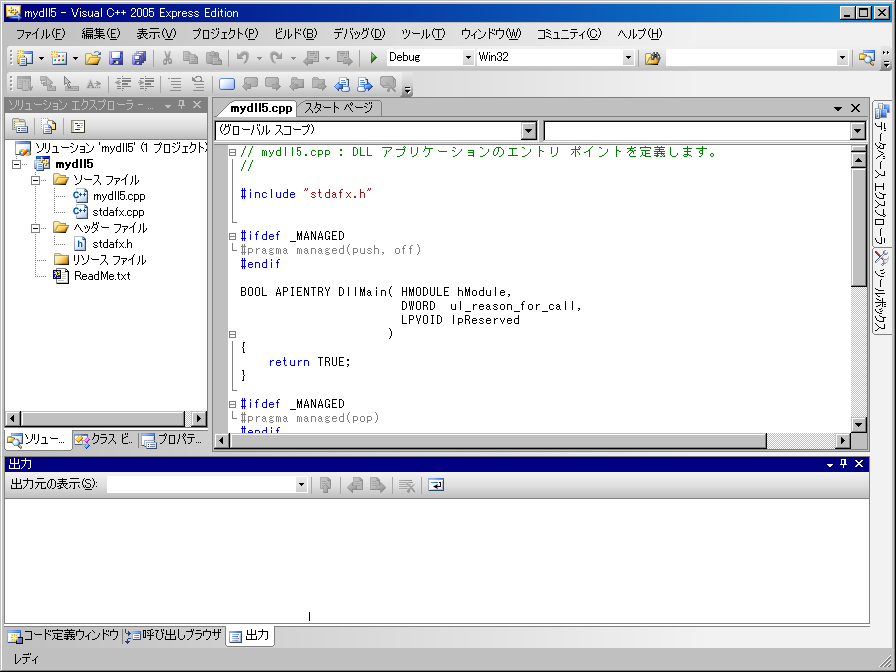
インストールパッケージsamples\vpi\vpi_sourcesにある全てのファイルをVisualC++のプロジェクトフォルダ下にコピーします。
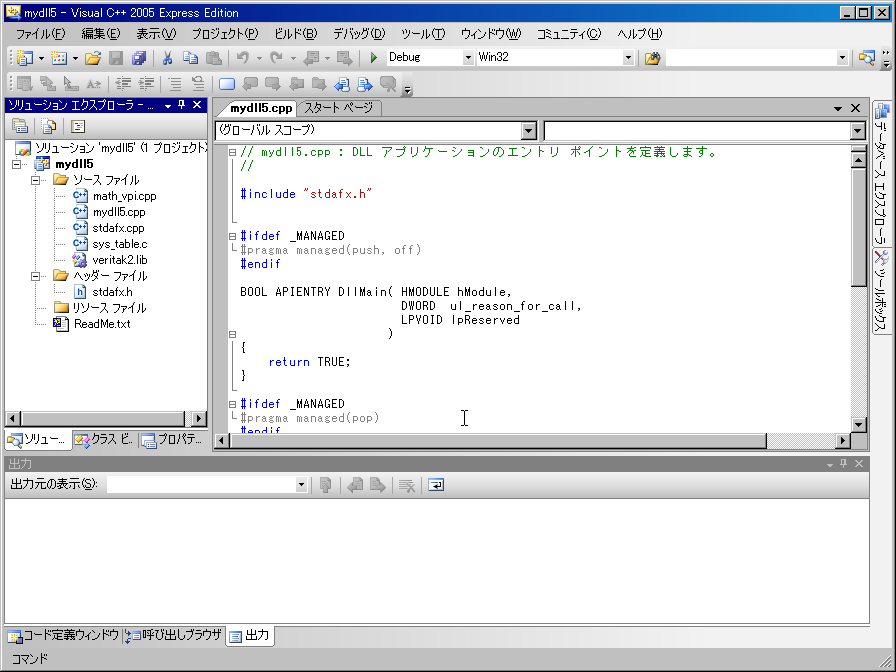
以下のファイルを選択して、「ソースファイル」->右クリックメニュー->「追加」->「既存の項目」、で追加します。

「libの規則..」というメッセージが出ますが、「いいえ」を押します。すると次の状態となります。
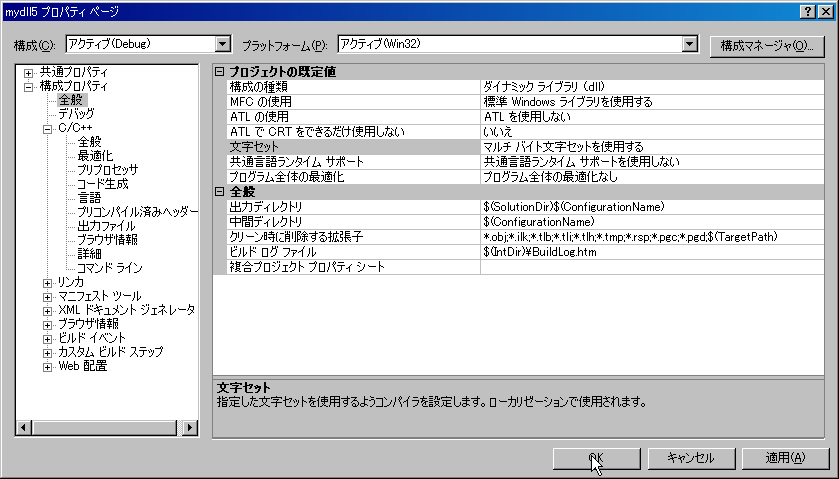
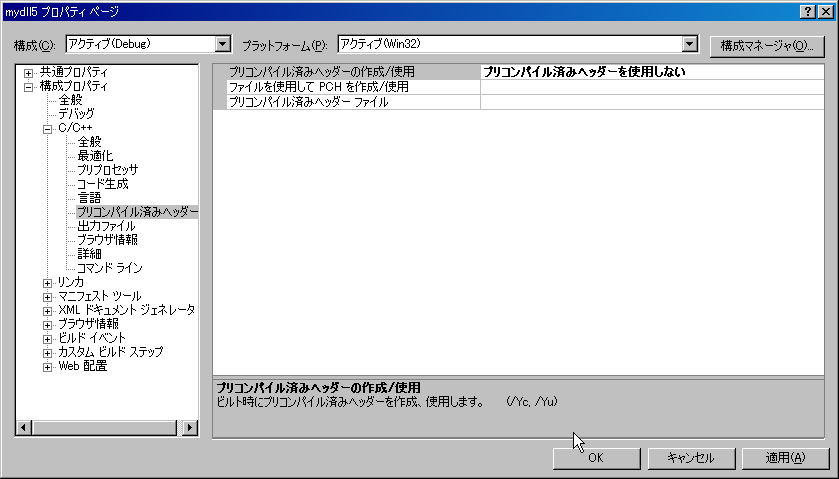
mydll5 を右クリックしプロパティ画面を設定します。文字セットは、「マルチバイト」としてください。
次は、Veritak固有ですが、構造体のアライメントを4としてください。シミュレーションエンジンとの整合を取るためです。
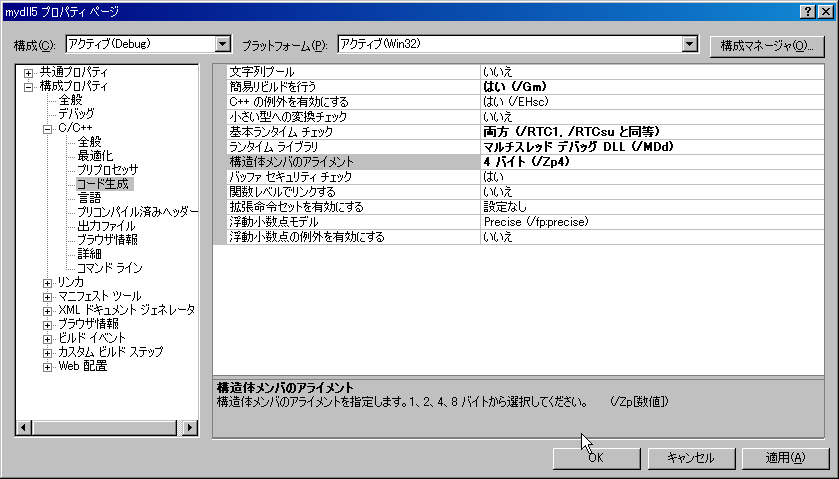
最後に「プリコンパイル済みヘッダは、使用しない」にして、OKを押して設定終了です。
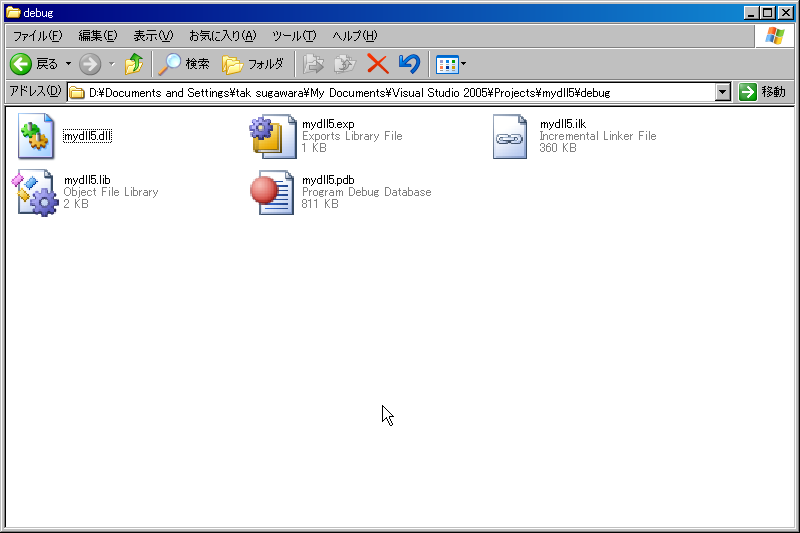
DLLのビルドは、ビルド->mydll5のビルドをクリックすると始まります。いくつかワーニングは出ます。エラー0になっていれば、ビルド成功です。デバッグビルドでは、次のフォルダにmydll5.dllファイルが出来上がっていることがわかります。
Note1:
vpi_user.h と veritak2.lib は、開発中のため、常にアップデートしています。veritak2.exe
とセットでお使いください。(インストールパッケージにあるものをそのままお使いください。)
Note2: エラーが大量に出力される場合は、恐らく、プリコンパイルヘッダの設定の問題です。上の設定を確認してください。
Note3: windows.h が見つからない、というメッセージでのコンパイルエラーは、恐らく、Platform SDKのINCLUDEフォルダへのパスが通っていません。プロジェクトのINCLUDEでPlatform SDKのパスを設定するか、microsoftの文書にあるように、VCProjectEngine.dll.express.config にPlatform SDKのINCLUDEフォルダへのパスを加えます。
Note4: リンカでのエラーは、Platform SDKのLIBフォルダへのパスが通っていません。プロジェクトリンカ設定にPlatformSDK LIBフォルダへのパスを追加するか、microsoftの文書にあるように、VCProjectEngine.dll.express.config にPlatform SDKのLIBフォルダへのパスを加えます。
Note5: Version 3.01Aより、このサンプルのDLL の名称をmy_vpi5.dll に変更しています。
Note6: $myfindwindow でアプリケーションを正しく初期化できませんでした(0xc0000135) とエラーがでるときは、.net framework がPCにインストールされていません。.net
framework をインストールしてください。
Note7: 本サンプルのVisual C++ Express Edition Project/C# Project/Veritak
Project のソースは、ここの ”Verilogで LEDちかちか..” の章にあります。
7.4.3 DLLのデバッグの方法
デバッグは、各々の環境により違いがあります。話を簡単にするために、インストールパッケージのVeritakの実行ファイル郡と、samples\vpi下のファイルを上のフォルダにコピーします。ただし、mydll5.dll
は、コピーしないで、デバッグビルドしたものをそのままお使いください。
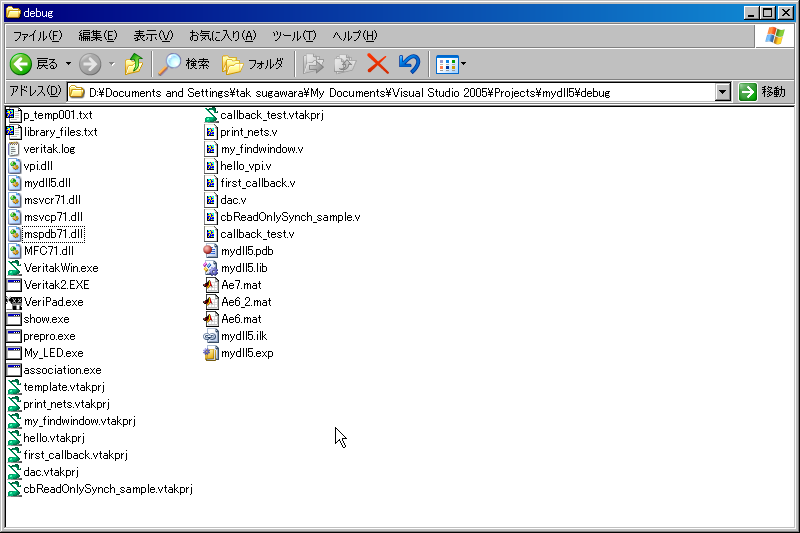
DLLは、単独では、実行できませんので、起動は、シミュレーションエンジンであるVeritak2.exeから行います。また、GUIの VeritakWin.exeが走っているとデバッグができませんので、終了させておいてください。
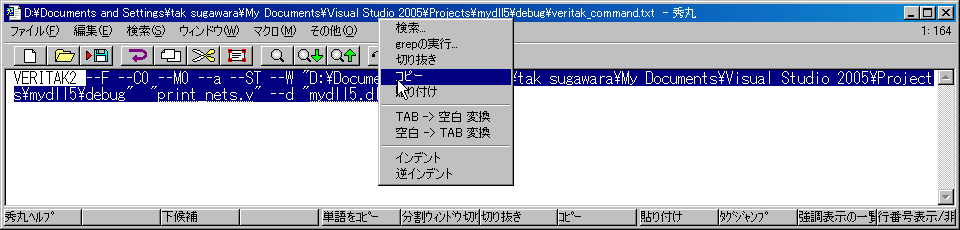
コマンドラインの取得
上のフォルダ上のVeritakWin.exeをクリックして、上のフォルダ上のたとえば、print_netsのプロジェクトを走らせると、"veritak_command.txt"
というテキストファイルが同フォルダに出来ます。これは、GUIがシミュレーションエンジンVeritak2.exeに渡しているコマンドラインになっています。したがってこのファイルから、COPY&Pasteすると簡単です。
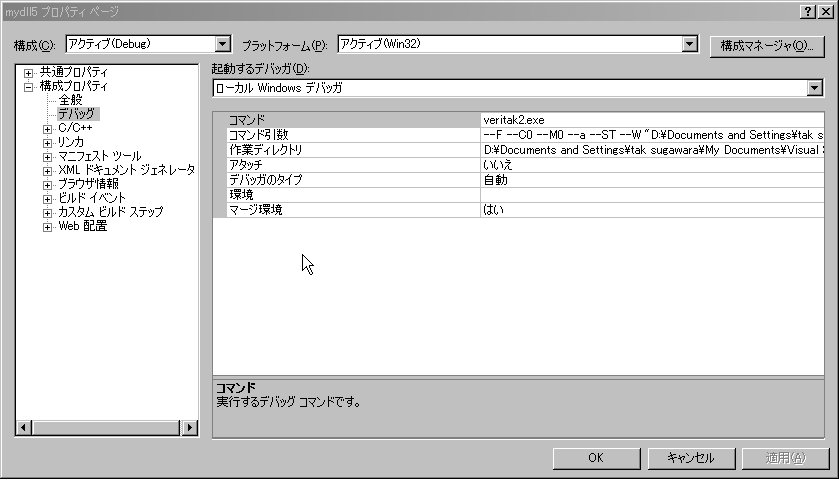
デバッガの起動
コマンドを veritak2.exeに
コマンド引数を上のコピーをPasteします。
作業フォルダは、上のフォルダに設定します。(クリックして参照..です)
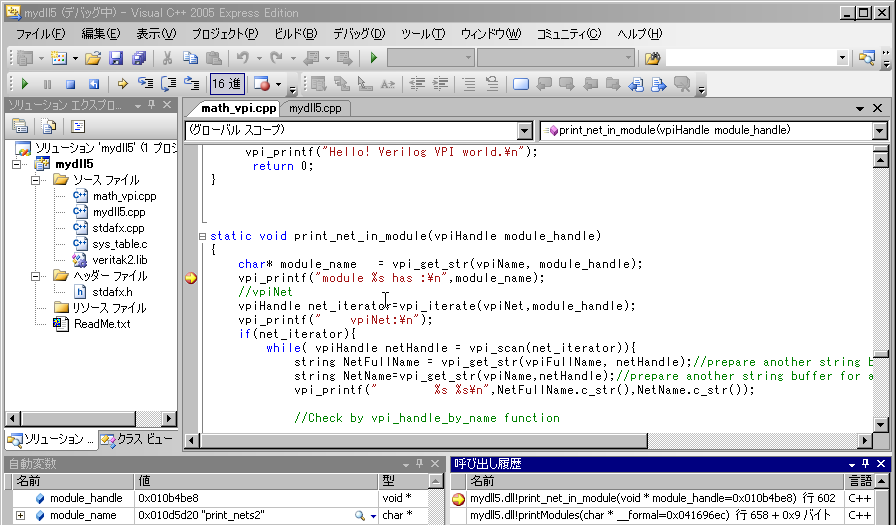
次にソースを開いて呼び出される箇所にブレークポイントを置きます。
「デバッグ」->「デバッグの開始」で、ブレークポイントで停止します。お使いになると、Visual C++は、強力なデバッグ環境であることが分かると思います。
なお、デバッグビルドでは、実行速度が10倍程度遅いので、デバッグが終了したらリリースビルドされることをお勧めします。その際、プロジェクトの設定は、再度必要になりますので、ご注意ください。
Note1:
Veritak2.exeのデバッグシンボルがない、というメッセージが出ることがありますが、構わずに進んでください。
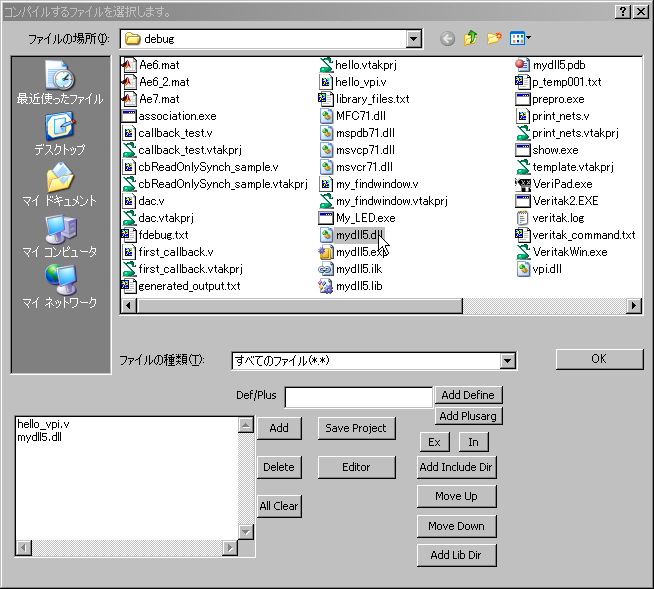
7.4.4 作成したDLLの組み込み
通常どおりVerilog ソースファイルをプロジェクトに加えるのは同じです。DLLの組み込みは、ファイルの種類を「すべての種類」にすると、DLLファイルが見えますので、通常ソースと同様にダブルクリックするか、Addボタンでプロジェクトに加えます。